In some vehicles, you may not able to access the light bulbs very easily. In some newer vehicles, you may also need to remove the front bumper cover or even remove the whole headlamp assembly in order to access and change the bulbs.
The Car Care Kiosk Website is a good resource to find videos of how to access and change any vehicle bulb.
STEP 1: Go to the link https://www.carcarekiosk.com/.
STEP 2: Search your vehicle by Make / Model / Year / Engine.

STEP 3: Select the bulb type you are looking to change.

STEP 4: The video will guide you step by step to access and change your light bulbs.

Keywords: change vehicle bulb, access light bulbs, Car Care Kiosk, remove bumper cover, headlamp assembly, vehicle maintenance, bulb replacement guide.
If you have ever experienced an oncoming driver who’s lights were blinding you or noticed that your lights tend to illuminate the tops of roadside trees instead of the road, there is a good chance that you are dealing with misaligned headlights.
Correct headlight alignment is extremely important for vehicle safety. Driving with misaligned lights is dangerous, and they should be adjusted as soon as possible. Properly aligned headlights not only light up the road, but they also help illuminate road signs and any animals that might jump out onto the road.
Luckily, adjusting your headlights is a pretty easy fix that most people can handle in their driveway or garage. However, newer vehicles that have halogen or high-intensity bulbs should be taken to a professional for proper alignment.
It is fairly simple to check the alignment of your lights. All you need is a flat surface, a wall to project the lights on, a tape measure, a carpenter’s level, a screwdriver, and some tape. Here are step-by-step directions on how to verify your lights are aligned.

Step 1: Prepare the car.
In order to make sure the car is properly leveled when aligning the lights make sure all the tires are properly inflated, the vehicle has at least a half tank of fuel and there is someone sitting in the driver’s seat. This will ensure that the vehicle is leveled and is reflects common driving conditions when the measurements are taken.

Step 2: Park the car.
Find a flat level surface with a wall in front of it and park the vehicle about 10 to 25 feet from the wall or garage door with the lights aimed at the wall. This distance is optimal as it recreates common conditions out on the road. If you have a flat driveway, the garage door should work well, otherwise consider the ground floor of a parking ramp as it is usually flat, dark and has a wall.
Step 3: Level the car.
Push down all four corners of the vehicle up and down a few times to settle the suspension and make sure the shocks are level.

Step 4: Measure the lights.
Use the tape measure to measure from a fixed point on each of the headlamps down to the ground. The measurements should be within a half inch of each other. This will verify the suspension is not sagging on either side, which would throw off the measurements.
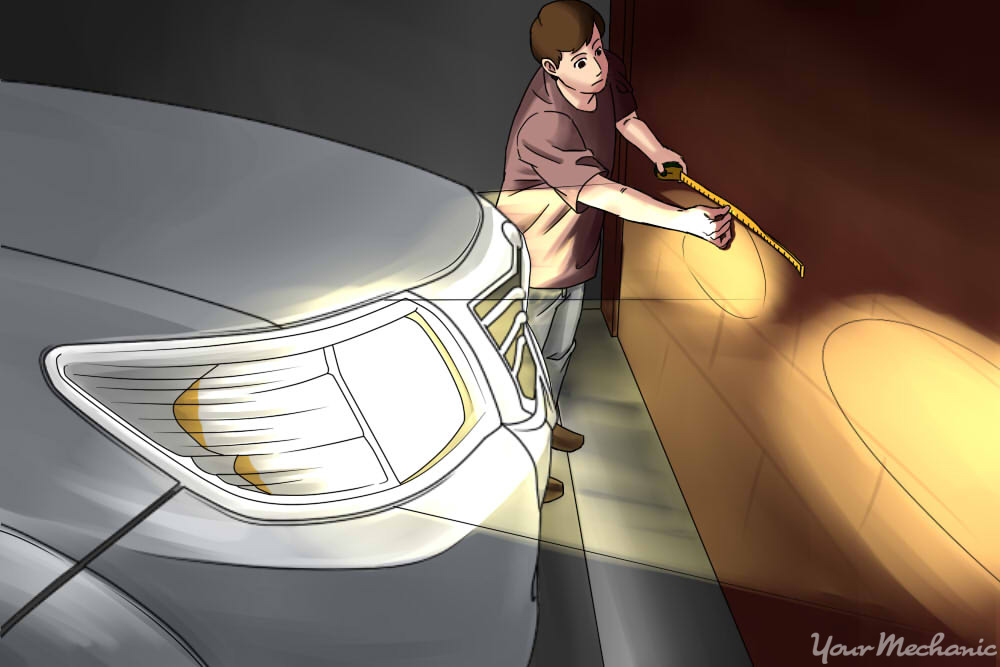
Step 5: Turn on the headlights.
Turn on the lights but do not use the fog lights or high beams. Use the tape to mark both the horizontal and vertical centerlines of the headlight beams.

Step 6: Measure the lines.
The centerlines should not be any higher than 3.5 feet above the ground. Use the carpenter’s level to verify the centerlines from each headlight are even. If the lines are not even, lower the higher mark to the level of the lower one.

Step 7: Back up the car.
The car should now be backed up so it is sitting exactly 25 feet from the wall. This should not be estimated, use the tape measure so the vehicle is exactly 25 feet away.
Now it’s time to make the adjustments to get your lights shining down on the road, where they belong.

Step 1: Find the adjustment screws.
The first thing you need to do is locate the adjustment screws on your vehicle. In many cases, it will be necessary to remove the trim ring from the headlight. Most adjustment screws are located on the top and side of the light housing. They should be clearly marked.
Step 2: Adjust the headlights individually.
If possible, having another person sitting in the driver’s seat that can turn the lights on and off will be a big help. The headlights should be adjusted one at a time. Put a rag or towel over a chair in front of the light you want to block. Covering the light assembly directly can damage the plastic lens – it can get too hot if fully blocked.
Step 3: Adjust the vertical field.
The screw on the top of the light housing should be turned clockwise to raise the lights and counterclockwise will lower the light. The headlight should be adjusted until the top of the most intense part of the light beam shines directly on or just below the center of the tapeline on the wall.

Step 4: Adjust the horizontal field.
The screw on the side of the light housing should now be turned to get the right/left adjustment correct. Adjust the lens so that the most intense part of the beam is to the right of the vertical line.
Step 5: Check manufacturer guidelines.
It is always a good idea to check the manufacturer’s guidelines when adjusting headlights, as there may be very precise specifications that should be followed. This is especially true with the brighter headlights on new vehicles.
Step 6: Test your results.
It’s time to get the vehicle out on the road to make sure the headlights are adjusted properly. This step is important because if you have done the adjustment incorrectly the headlights could be further out of adjustment. Check them on dark road so you can properly judge the adjustment. If they are still not properly adjusted repeat these steps until they correct.
Source of the article: www.yourmechanic.com
by Mark Vallet on January 20, 2016
Keywords: Adjust headlights, Headlight aiming, Headlight adjustment guide, Headlight alignment, Proper headlight adjustment, DIY headlight aiming, Car headlight alignment, Aligning headlights
Let’s say a customer purchases an H16 bulb and finds it doesn’t fit. What is going on, and how come it doesn’t fit?
The problem is that many aftermarket LED manufacturers call the 5202 bulb an H16. However, in Japanese vehicles, the H16 bulb is part of the H9/H11 bulb family. The biggest difference between H8, H9, H11, and H16 bulbs are both the wattage levels they run at and whether or not they have paint on the reflector cap at the top of the glass tube. H16 bulbs are most commonly used in fog lights, whereas H11 bulbs are most commonly used in headlights. Therefore, you’ll see that H11 bulbs look almost identical to H16 bulbs but have higher wattages than H16.
From the photos below, you will see that the H16 is quite different from the 5202.

When you find your car fog light is an H16, if the car is a Japanese vehicle (such as Toyota, Nissan, Lexus, Subaru), the fog light is an H16 (you can also use an H11 to replace it). However, if the car is an American vehicle (such as Chevrolet, GMC, Ford), then the fog light is a 5202 instead of an H16.
Understanding these differences is crucial for ensuring you purchase the correct bulb for your vehicle. Always check your vehicle’s manual or consult with a professional before making a purchase.
By being aware of these distinctions, you can avoid the common mistake of purchasing an incorrect bulb for your vehicle.
Let’s say a customer purchases an H16 bulb and finds it doesn’t fit.
What is going on and how come it doesn’t fit?
The problem is all aftermarket LED manufacturers call the 5202 bulb an H16. But in Japanese vehicles, the H16 bulb is part of the H9/H11 bulb family. The biggest difference between H8, H9, H11 and H16 are both the wattage levels that they run at and whether or not they have paint on the reflector cap at the top of the glass tube. H16 are most commonly used in fog lights, whereas the H11 is most commonly used in headlights. Therefore, you’ll see that H11 bulbs look almost identical to H16 bulbs but have higher wattages than H16.
From the below photos, you will find the H16 is quite different with 5202.
So basically, when you find your car fog light is a H16, if the car is Japanese Vehicles (such as Toyota, Nissan, Lexus, Subaru), the fog light is a H16 (you can also use H11 to replace it), but if the car is American Vehicles (such as Chevrolet, GMC, Ford), then the fog light is 5202 instead of a H16.
Keywords: H16 bulb, 5202 bulb, LED bulb compatibility, Japanese vehicles, American vehicles, fog lights, H9/H11 bulb family, aftermarket LED manufacturers, bulb wattage, reflector cap.
To help our customers and partners keep up with the latest information from ARC, please find owner manuals, install guides, and product reference materials below. You may view or download these materials from here.
ARC Tiny Monster Xtreme Series User Manual
ARC Tiny Monster Concept Series User Manual
Visit the ARC Lighting YouTube channel to watch ARC Lighting support and information videos.
For videos on the removal and replacement of your light bulbs and more, we suggest visiting Car Care Kiosk.
By providing these resources, we aim to ensure that you have all the information you need to get the most out of your ARC products.
Keywords: ARC user manuals, ARC reference materials, ARC install guides, ARC product manuals, ARC support documents, ARC Lighting user guides, Download ARC manuals
One of the most common questions we hear every day is what orientation should my LED bulb face? LEDs are “directional” light sources, which means they emit light in a specific direction, unlike halogen bulbs, which emit light in 360°. If not properly oriented, the light will appear to have poor output or beam pattern, and it may cause glare for other drivers. That’s why LED bulbs must be positioned correctly according to the different optical designs of the headlamps.
For single filament bulbs, the diodes (LED chips) should always be in a side-to-side orientation. This means you should have one set of LEDs facing at 3 o’clock and the other set facing at 9 o’clock. This will allow a nice and even 360° light distribution throughout the housing, creating an even beam of light and evenly filling up the housing.

For dual headlight setups that provide low and high beams from one bulb, we use the same side-to-side orientation. Dual beam bulbs have two sets of LED chips on both sides of the bulb. The two chip sets need to be aligned according to the illustration below.

In most cases, all bulbs are initially set to an optimal operating angle, and adjustment is not always required. Check the bulb orientation right away after you install the LED bulbs before any harness is connected. Please check the LED Bulb Adjustment Guide for details on how to adjust the angle of the bulbs.
By following these guidelines, you can ensure that your LED headlight bulbs provide the best possible performance, with an optimal beam pattern and minimal glare for other drivers.
Keywords: LED headlight bulb orientation, LED headlight alignment, Proper LED bulb orientation, LED bulb positioning, Headlight beam pattern, LED headlight adjustment, Best LED headlight setup
When looking for new headlights, such as LED headlight bulbs, everyone wants to know, “What’s the brightest headlight bulb?” To answer that question and to truly get a better picture of what “brightness” is, we need to get scientific and define a few terms. So stick with me for a moment, and you’ll be a pro when it comes to understanding true headlight brightness. I’m going to make this article as simple as possible to wrap your head around.
The two main words to define as we talk about headlight brightness are lumen and lux.
A unit of measurement for luminous flux, which is a measure of the total quantity of visible light emitted by a source.
A unit of measurement for illuminance, which is a measure of how much luminous flux is spread out over a given area.
“One can think of luminous flux (measured in lumens) as a measure of the total “amount” of visible light present, and illuminance (measured in lux) as a measure of the intensity of illumination on a surface at a particular distance from the source.”
So let’s think about these definitions as we see how lumen and lux amounts are measured and how that process applies to headlight bulbs.
Luminous flux, which I’ll just refer to as lumen, is measured inside of a device called an integrating sphere. A bulb is placed inside the sphere, and the light given off by the bulb is scattered by the interior of the integrating sphere and evenly distributed over all angles. While this method of measuring the brightness of a bulb works well for lighting applications where 360 degrees of light is needed (such as a table lamp), the lumen amount is only half of the story while testing the brightness of headlight bulbs. The total lumen amount of a light source can be measured accurately since light can be captured from all angles from inside the sphere. This is why illuminance and lux are so important.
Lux is measured by installing the bulb inside a headlight housing and testing to see how well the lumen amounts are projected or reflected out from the housing. In this instance, we measure the beam pattern created from the headlight housing and bulb combination on a wall 25 feet away. From this distance and this position, we can see the lumen amounts from the bulb that are truly being utilized and turned into a usable beam pattern by the headlight housing. When measuring lux this way, we can take into account multiple factors playing into the brightness of the bulb and find a clearer picture of true, usable light. The lumen amount from the bulb, the relationship between bulb and headlight housing, the resulting beam pattern, and distance are all factors when calculating lux this way.
A digital light meter is used to measure lux. In this application, lux is being measured in a beam pattern created by an LED bulb inside a headlight housing.
So you’re probably thinking, “Well then, doesn’t that mean a headlight bulb with the highest lumen amount will be the brightest?” Maybe. Remember, lumen amounts are only one piece of the puzzle when determining usable light brightness.
“A given amount of light will illuminate a surface more dimly if it is spread over a larger area, so illuminance (lux) is inversely proportional to an area when the luminous flux (lumens) is held constant.”
It is possible for a bulb with high lumen amounts to focus poorly once placed inside a headlight housing due to poor engineering and design. In that case, a poorly focused beam pattern from a bulb with an initially high lumen amount would have low lux measurements because the light is spread out or unfocused. The result would be an unfocused beam pattern with light reflected or projected poorly. A headlight like this would be “bright” on paper, but not actually usable in a real-world scenario.
Keywords: Lux vs lumen, Headlight brightness, LED headlight bulbs, Headlight lux, Luminous flux, Illuminance, Brightest headlight bulb, Measuring headlight brightness, LED bulb brightness
When it comes to headlights, which color is best – yellow or white? Drivers have been asking this question for years. While some drivers swear that yellow lights are the only way to see in poor weather conditions, others argue that white lights are brighter and therefore better.
In this article, we’ll take a look at the pros and cons of both yellow and white headlights and determine which is better on the road.
In the 1930s, selective yellow light was used in many headlights. These were designed to filter out any blue tones and thus emit a yellower light. Yellow light also cuts through rain, snow, and fog better than white or blue light. Early studies showed that yellow light was less dazzling to other drivers, making it a safer color for headlights.
For decades, all headlights had a yellow tint. As electric headlights became popular, yellow light was believed to be better. The very first headlights that were invented were powered by acetylene lamps, which produced a yellow light rather than today’s headlights.
Although yellow headlights were more popular for decades, most countries allowed either yellow or white. The exception to this is France. From 1936 all the way up to 1993, vehicles by law were required to have yellow headlights. Today, either white or yellow headlights are permitted in most countries around the world.
However, yellow lights have fallen out of popularity as headlights. While yellow light improves visibility in wet or foggy conditions, it can also be harder to see with yellow lights in clear conditions. As a result, many vehicles today use yellow lights only as fog lights.
White lights are the most popular color for headlights today. In many countries, headlights are no longer allowed to be yellow and must be white in color. European regulations, for example, require all new vehicles to be manufactured with white headlights.
As headlight technology improves, some bulbs skew towards the blue end of the spectrum (rather than yellow). Xenon HID’s, which are brighter than the old halogen bulbs, often have a blue tint. This is fine, up to a certain point, but headlights that are too blue are less effective.
White light is preferred for many reasons. The filters used to create selective yellow light dim the brightness of headlights. White light is unfiltered, making it brighter. A whiter light mimics the appearance of sunlight and improves visibility.
The ideal headlight color is pure white. When searching for white headlight bulbs, pay attention to the color temperature. Bulbs with a Kelvin rating of around 4000K for halogen bulbs or 5500K for xenon HID or LED are the whitest and brightest.
Keywords: Headlight color, Yellow headlights, White headlight, Best headlight color, Headlight visibility, Headlight safety, Yellow vs white headlights, Headlight performance, Car headlight comparison
Reflector vs Projector Headlights: Which is Best for Your Car?
Until recently, all vehicles contained the same style of headlight housing. Today, there are two types of headlights: projector and reflector. Reflector headlights are the old style found on cars made in the early 2000s or before. Projector headlights are newer, but not every new car has them.
In this article, we’ll examine the differences between these two types of headlights and discuss which is better.
In older reflector headlights, the shape of the light beam was determined by the lens in the front of the headlight. With this type, known as a sealed-beam headlight, the casing cannot be removed to replace a burned-out bulb.
Reflector headlights have been standard on vehicles since the invention of electric headlights. Mirrors are placed within the bowl to reflect light onto the road. A reflector headlight consists of a bulb encased in a steel bowl.
In the 1980s, improvements in technology led to reflector headlights that used mirrors inside the headlight housing itself to guide the beams. This meant it was no longer necessary for the lens and the headlight housing to be sealed, and bulbs could be easily removed or replaced.
Many new vehicles continue to be made with reflector headlights. There are a few advantages to this style that make them popular even today:
Projector headlights are a newer invention in the world of headlight technology. They were first used on a large scale in the 1980s in some luxury vehicles. Since then, projector headlights have become popular on all types of vehicles.
Projector headlights are similar to reflector headlights. They contain a bulb in a steel bowl with mirrors to act as reflectors. However, a projector headlight also has a lens that acts as a magnifying glass, increasing the brightness of the light beam.
To ensure that the light produced by these types of headlights is angled properly, there is also a cutoff shield. This helps to direct the light down towards the road. Thanks to the shield, projector headlights have a very sharp cutoff.
Projector headlights are growing in popularity for several reasons:
When searching for the best headlights, most drivers want the brightest headlights possible without creating problems for other drivers. Projector headlights are brighter than reflector headlights, and they are less likely to blind oncoming traffic.
It’s also worth mentioning that projector headlights allow drivers to use xenon HID bulbs instead of the older halogen bulbs. Considering all of this, it’s clear that projector headlights are better than reflector headlights.
Keywords: Reflector headlights, Projector headlights, Reflector vs. projector headlights, Best headlights for cars, Headlight comparison, Headlight types, Reflector vs. projector headlights benefits, Projector headlights advantages, Reflector headlights advantages, Car headlight guide